Project Scramboneer
(as published in the Flatlander's Jeep
Club Newsletter)
OK, so how the heck does a guy end
up with a Purple Scrambler with a 360 V-8, 3 speed automatic? Long story.
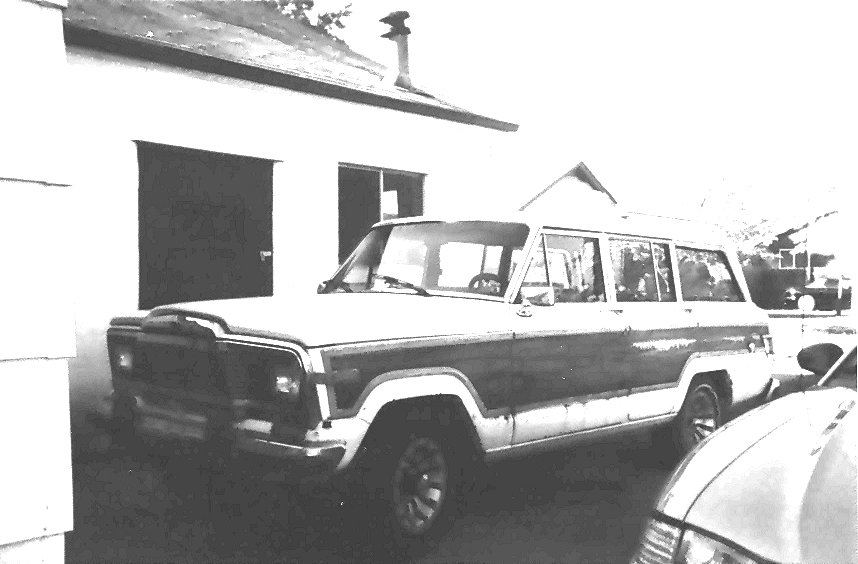
Here's the short version: I had an '81 Wagoneer "Heavy Metal"
that would've ended up like the War Wagon (except I'd've stopped at 35's!). {Ed
note: The War Wagon is a '76 Cherokee built by Bob B., a member of the
Flatlander's Jeep Club. It sports a 360 built like mine, gobs of lift sufficient
to allow 44" mudders!)
I had finished putting in the Edelbrock Performer cam
/ valve spring / manifold / carb / Holley racing electric fuel pump before we'd
moved out here from Virginia. The plan was to tackle the transmission next.
That's when the transfer went BANG!!
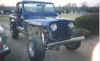
About that time I ran across the Scrambler for
a pretty good price, so there's Jeep #2 in the driveway. As I stood in the
driveway looking back and forth at my Scrambler with a 6 cyl, 4 spd manual - not
too shabby - and my busted up Wagoneer. My wife walks up and says
"well, will the Wag's engine fit in the Scrambler?" Ladies and
Gents, I'm here to tell you there's nothing better than a wife that's a Jeep Nut
too <grin>
Phase 1 - Planning your project
Spending more time here saves more time and
money later. Decide: 1) what do you want your Jeep to be capable of when
you're done; 2) whether used parts are as good as new; 3) what you're going to
do if you get in over your head.
For me, I wanted my Scrambler to be able to run
well on the road, and have enough torque to idle through most of the easy trail
at our local ORV park. Any modifications had to be functional and over-engineered.
I was willing to spend a little more for a new or better part so that when I got
done, it looked good enough for a magazine.
 Phase
2 - Engine prep
Phase
2 - Engine prep
Engines come down to "pay me now" or
"pay me later". If you're going to put an engine in, might as
well do it right and get it rebuilt before you install it. The more work
you can do yourself the more labor costs you save. There are many books and
experts out there, seek them out and learn all you can before starting.
Changing a cam or rear main seal now won't be nearly as painful as doing it six
months from now!
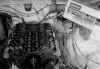
I used the 360 from my wagoneer shown here.
(As you can see, I chose to do the upgrade while still in the Jeep. Not
the preferred method, but I was short of space in the garage). The 304,
360, 390 and 401s are all the same externally. 304's are found in old
CJ-7's, 360's in a good percentage of Full Size Jeeps (Wagoneers, Cherokees,
J-10, J-20, Gladiator). Not sure where the 390 came into play, and the 401
was in some mid-70's FSJs and those performance AMC cars. Some of the
401's came with a factory 4 barrel carb setup.
The decision to use the 360 came from may
things: 1) I need to "keep it Jeep". Chevy 350's bore me.
2) since the CJ-7s and CJ-8s are the same up front, it will bolt right up using
304 mounts. 3) I already had the engine. "See, I'm saving money
already!"
Phase 3 - Tranny prep
Unless you know a bit about transmissions, find
one in good shape to start with. Keep in mind a few things: not all
trannies are the same length (a change here could mean up to $400 in new
driveshafts); not all trannies are the same strength - T-5s aren't a good match
for a blown/injected 454. Research here will pay off as well.
If manual, get the flywheel resurfaced, a new
pressure plate/disk/throwout, any seals you can get to, and change the fluid.
If automatic, get an external cooler (the one in the radiator doesn't count) and
a shifter you can trust. Cables are better than linkages if you're going
to flex your Jeep (who wouldn't?) 'cuz they won't bind up.
I used the wag's Torqueflite 727 and a B&M
Megashifter. I got a low-stall torque converter to keep temps down and
keep the V-8 from blowing the driveline apart when I gun it. I installed a
TCI Streetfighter racing rebuild kit. It didn't come with instructions.
Don't try this at home, I am a professional. Faint of heart beware.
Phase 4 - CJ prep
Spend some time marking important things on the
frame like: front of bellhousing, front of transfer case, rear of radiator,
front of engine pulley. These will help you avoid surprises later. Be
sure to mark every wire. Even if "well, it's the only orange one with
a clip on the end" - you'll be sorry :) Remove both fenders, all the
grille stuff, etc. It'll just get in the way or get damaged.
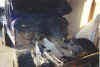
Phase 5 - Driveline swap
Take extra time to drain all the fluids.
Double and triple check all wires and linkages before pulling the old driveline.
Don't forget the ground strap under the engine mount. If possible, remove
the transfer first to even out the weight on the lift. I rented my engine
hoist to do the swap. With the number of times I rented, I could've
bought one for the same price, but I'd decided that $60 four times is easier on
the pocket than $200 once. Don't forget the engine leveler. Use bigger chain
than you need.
 Once the engine is out, you can swap out the engine mounts. If you stick
with the AMC V-8, you only need to change the right side frame-side mount.
Truth be known, you don't even need to change it. Welding the holes shut
and redrilling for the V-8 resilient pad will save you $80. Use new resilient
pads/sandwich pads/rubber mounts/whateveryacall'em. They're
about $10 each from O'Rielley's Auto Parts. Change them now, it will be much harder
later. You must also change the engine-side mounts as well, available from
Briggs. If you go this route, the V-8 will drop into the correct location.
If you're using anything besides an AMC, there will be much measuring, welding
and fabrication here. Advanced Adapters are very helpful with both parts
and advice.
Once the engine is out, you can swap out the engine mounts. If you stick
with the AMC V-8, you only need to change the right side frame-side mount.
Truth be known, you don't even need to change it. Welding the holes shut
and redrilling for the V-8 resilient pad will save you $80. Use new resilient
pads/sandwich pads/rubber mounts/whateveryacall'em. They're
about $10 each from O'Rielley's Auto Parts. Change them now, it will be much harder
later. You must also change the engine-side mounts as well, available from
Briggs. If you go this route, the V-8 will drop into the correct location.
If you're using anything besides an AMC, there will be much measuring, welding
and fabrication here. Advanced Adapters are very helpful with both parts
and advice.
Depending on the transmission selected, your
skid plate may or may not bolt up. The transmission tailshaft has the rear
support attached, so if you get a different transmission, ensure you get the
support off the donor too.
Here's where you get to hope for driveshafts
that fit. With the 727, the driveshafts from the T-5 equipped Scrambler
worked fine. This is where I discovered that the 727's pan is shaped for a
left-side driveshaft. A right-side shaft hits the pan. After several
emails to folks listed on my Scrambler Registry, I found that a 4"
suspension lift will fix it. So far, it has. (Gee, twist my arm.
"I gotta put on the lift kit, it won't work without it!")
The ignition "brains" are different,
but the plugs are the same. Don't try to run the '8 with a '6 computer
(bad things happen).
Phase 6 - Loose ends, shoulda coulda
woulda's
I was looking for low-end torque instead of
high-revs, so I put replaced the 600 CFM with a 500 CFM. I had read that a
smaller carb will help low end response. It may be my imagination, but I'd
swear it's true!
 Don't get in a rush at the end. Before you fire the '8, triple check every
hose and fluid level. I disconnected the "brain", cranked the
engine for 3 seconds. I did this a few times to get the oil flowing.
Another way to do it is to remove the distributor and spin the oil pump, but I
didn't want to mess up the timing setting. I hooked up the brain, dumped a
cap full of gas in the carb (put the air cleaner on - a backfire can be an
engine fire without it). Ensure whatever you've rigged up for an exhaust
directs the heat away from your wires and fuel line (stock runs up the inside of the
right side frame rail).
Don't get in a rush at the end. Before you fire the '8, triple check every
hose and fluid level. I disconnected the "brain", cranked the
engine for 3 seconds. I did this a few times to get the oil flowing.
Another way to do it is to remove the distributor and spin the oil pump, but I
didn't want to mess up the timing setting. I hooked up the brain, dumped a
cap full of gas in the carb (put the air cleaner on - a backfire can be an
engine fire without it). Ensure whatever you've rigged up for an exhaust
directs the heat away from your wires and fuel line (stock runs up the inside of the
right side frame rail).
Rose Muffler did the custom dual exhaust for
$140. I used header wrap from the manifold back to the transfer. I
encourage an "H-pipe" as close to the engine as possible- an H pipe
connects the left and right side
exhausts. The theory is that it equalizes the pressures behind the exhaust
valves, helping the intake side flow better. 4Wheel&OffRoad did
an article just recently on exhaust mods and one of their findings was that the
crossover made more off-idle torque improvements than all the other stuff
(high-flow cat, headers, turbo mufflers, larger exhaust pipes, etc.) put
together.
Take the time to dress up the engine
compartment, tie up wires, paint if needed.
As mentioned, I used a Megashifter from
B&M. I went through a few cables before I got the right length (4')
and the right size - I needed the SuperTough size, it's about twice as thick as
the one that came with the shifter.
The work continues. See updates on my webpage
at http://www.jeephead.com/scram1.html
Thanks for reading along, good luck with your
project!
Chris
Scramble On!
Not affiliated with American Motors Corporation, Jeep®
or Daimler-Chrysler. ©1999 OffRoad Vehicle Outfitters
 Phase
2 - Engine prep
Phase
2 - Engine prep
